
Networking@mathsblog
ശാസ്ത്രമേള-കലോത്സവം-സ്പോര്ട്സ്
സോഫ്റ്റ്വെയറുകള് നെറ്റ്
വര്ക്കിലൂടെ ഉപയോഗിക്കാന്
വേണ്ടി മാത്രം
1. മോഡത്തില് നിന്നും wired ആയി ഇന്റര്നെറ്റ് കണക്ഷന് ലഭിക്കുന്നുണ്ടോയെന്ന് നോക്കുക. ഇന്റര്നെറ്റ് ലഭിക്കുന്നുണ്ടെങ്കില് നെറ്റ് വര്ക്ക് ചെയ്യാം.
* (ലാപ്ടോപ്പാണെങ്കില് നെറ്റ് വര്ക്ക് കണക്ഷന്റെ ഐക്കണില് റൈറ്റ് ക്ലിക്ക് ചെയ്ത് Enable wirless ലെ ടിക് മാര്ക്ക് കളഞ്ഞ് വേണം പരീക്ഷിക്കാന് )
** (ഇന്റര്നെറ്റ് കിട്ടുന്നില്ലെങ്കില് നെറ്റ് വര്ക്ക് ഐക്കണില് റൈറ്റ് ക്ലിക്ക് ചെയ്ത് Edit Connections എടുക്കുക. wired connection ന്റെ edit ല് ക്ലിക്ക് ചെയ്ത് IPV4 settings ലെ method ല് DHCP ആക്കിക്കൊടുക്കുക. wired ല് ഉള്ളത് Delete ചെയ്ത് add ബട്ടണ് വഴി പുതിയൊരു കണക്ഷനെടുത്ത് Edit വഴി മുകളിലെ വരിയില് പറഞ്ഞ പോലെ ചെയ്യുക.)
(*** System - administration - users & Group എടുത്ത് എല്ലാ പെര്മിഷനും നല്കണം)
2. നെറ്റ് വര്ക്ക് ചെയ്യേണ്ട എല്ലാ സിസ്റ്റത്തിലും ഇതു പോലെ ചെയ്തതിനു ശേഷം എല്ലാം ഓഫ് ചെയ്ത് വെക്കുകയും തുടര്ന്ന് ഓരോന്നോരോന്നായി ഓണാക്കുകയും ചെയ്യുക. (ഓരോ സിസ്റ്റത്തിനും വ്യത്യസ്ത IP Address ലഭിക്കാനാണിത്) ഏത് സിസ്റ്റത്തിലാണോ offline software ഇന്സ്റ്റാള് ചെയ്തിരിക്കുന്നത് അതാണ് സെര്വര്. അതിലെ നെറ്റ്വര്ക്ക് ഐക്കണില് റൈറ്റ് ക്ലിക്ക് ചെയ്യുമ്പോള് Connection Information ല് അതിന്റെ IP Address നമുക്ക് കാണാനാകും. അത് ഓര്മ്മിച്ചു വെക്കണം.
3. അതിനു ശേഷം നെറ്റ് വര്ക്ക് ചെയ്തിരിക്കുന്ന സിസ്റ്റങ്ങളിലെ ബ്രൗസര് തുറന്ന് സെര്വറിന്റെ അഡ്രസ് ബാറില് ഐപി അഡ്രസ് നല്കി തുടര്ന്ന് സെര്വറിലെ local host എന്നു കഴിഞ്ഞു വന്നിരിക്കുന്ന ഭാഗം അതേ പടി ടൈപ്പ് ചെയ്യുക.
ഉദാ: സെര്വറിന്റെ IP Adress 192.168.1.3 ആണെങ്കില് നെറ്റ് വര്ക്കില് ഉള്ള അടുത്ത സിസ്റ്റത്തില് ശാസ്ത്രമേള എന്റര് ചെയ്യേണ്ടത് താഴെ പറയുന്ന പോലെ
http://192.168.1.3/sciencefair_subdistrict/index.php എന്നായിരിക്കും. ശാസ്ത്രമേളയ്ക്കും ഉപജില്ലയ്ക്കുമെല്ലാം സാധാരണഗതിയില് ഇത്രയും മതി നെറ്റ് വര്ക്കിങ്ങ്.
ഇനി നമുക്ക് കാര്യഗൗരവത്തോടെ ഫയല് ഷെയറിങ്ങും പ്രിന്റര് ഷെയറിങ്ങുമെല്ലാം എപ്രകാരമാണെന്ന് നോക്കാം. Network ചെയ്തിട്ടുളള computer കളില് operating system ത്തില് ചെയ്യേണ്ട മാറ്റങ്ങള് മുതല് ഓരോ സ്റ്റെപ്പും കൃത്യമായി ചെയ്യുക.
Network IP Address set ചെയ്യാന്
System – Preferences – Network Connections. എന്ന option select ചെയ്യുക.
 അതിനു
ശേഷം വരുന്ന ജാലകത്തില്
Auto eth0 select ചെയ്ത്
Edit click ചെയ്യുക
അതിനു
ശേഷം വരുന്ന ജാലകത്തില്
Auto eth0 select ചെയ്ത്
Edit click ചെയ്യുക
ഇപ്പോള് തുറന്നു വരുന്ന 'Editing Auto eth0' എന്ന ജാലകത്തിലെ ‘IPv4 Settings’ tab select ചെയ്ത് method എന്ന option ല് manual ആക്കുക. അതിനു ശേഷം Add ബട്ടനില് click ചെയ്ത് IP address താഴെ പറയുന്ന രീതിയില് set ചെയ്യുക.
Address : 192.168.0.1 ( ഒരോ കമ്പ്യൂട്ടറിനും വ്യത്യസ്ത Address നല്ക്കുക. Eg : 192.168.0.2, 192.168.0.3 etc)
Netmask : 255.255.255.0
Gateway : 192.168.1.1 ( Internet Modem IP address)
DNS servers: 192.168.1.1 ( Internet Modem IP address)
Apply ബട്ടണ് അമര്ത്തുക. അതിനു ശേഷം Network restart ചെയ്യുക.

Network restart ചെയ്യാന്
Applications-Accessories-Terminalഎന്ന ക്രമത്തില് ടെര്മിനല് തുറന്ന്
sudo /etc/init.d/networking restart എന്ന് ടൈപ്പ് ചെയ്ത് Enter അടിക്കുക
മുകളില് പറഞ്ഞിരിക്കുന്ന കാര്യങ്ങള് network ചെയ്ത ഓരോ computer ലും അവര്ത്തിക്കുക. ഓരോ computerനും പ്രത്യേകം IP address നല്ക്കാന് മറക്കരുത്.
Printer share ചെയ്യാന്
Printer connect ചെയ്തിട്ടുളള computer ല് ചെയ്യേണ്ട പ്രവര്ത്തനങ്ങള്
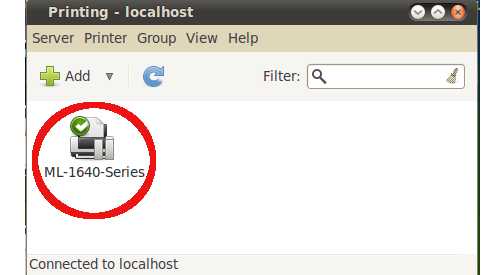
System–Administration–Printing എന്ന option select ചെയ്യുക.
ഇപ്പോള് computer ല് add ചെയ്ത printer കാണാം.
 ഇതില്
Server–Settings എന്ന
option select ചെയ്യുക.
ഇതില്
Server–Settings എന്ന
option select ചെയ്യുക.അതിലെ എല്ലാ ഓപ്ഷനിലെയും check box click ചെയ്യുക. Ok ബട്ടണ് അമര്ത്തുക.
 Install
ചെയ്ത printer
ല് right
click ചെയ്ത്
shared option select അണോ
എന്ന് പരിശോധിക്കുക.
Select അല്ലായെങ്കില്
select ചെയ്യുക.
Install
ചെയ്ത printer
ല് right
click ചെയ്ത്
shared option select അണോ
എന്ന് പരിശോധിക്കുക.
Select അല്ലായെങ്കില്
select ചെയ്യുക.Network ചെയ്ത computer കളില് ചെയ്യേണ്ട പ്രവര്ത്തനങ്ങള്
System–Administration–Printing എന്ന option select ചെയ്യുക.
ഇപ്പോള് കിട്ടുന്ന printing എന്ന ജാലകത്തില് add ബട്ടണ് select ചെയ്യുക.
 ഇപ്പോള്
കിട്ടുന്ന New printer ജാലകത്തില്
Select Device എന്ന
option ല്
Network Printer select ചെയ്യുക.
ഇപ്പോള്
കിട്ടുന്ന New printer ജാലകത്തില്
Select Device എന്ന
option ല്
Network Printer select ചെയ്യുക.തുടര്ന്ന് വരുന്ന option നില് Find Network Printer select ചെയ്യുക.
ഇപ്പോള് കിട്ടുന്ന ജാലകത്തില് Host എന്ന option ന് നേര്ക്ക് printer connect ചെയ്ത computer ന്റെ IP address type ചെയ്ത് Find ബട്ടണ് അമര്ത്തുക.
 കുറച്ച്
സമയത്തിന് ശേഷം printer find
ചെയ്ത്
verify option കാണിക്കും.
കുറച്ച്
സമയത്തിന് ശേഷം printer find
ചെയ്ത്
verify option കാണിക്കും.verify ബട്ടണ് click ചെയ്ത് verify ചെയ്യുക.
അതിനു ശേഷം Forward ബട്ടണ് അമര്ത്തുക.
Printer driver install ചെയ്തതിനു ശേഷം വരുന്ന ജാലകത്തില് Apply ബട്ടണ് അമര്ത്തുക.
ഇപ്പോള് network printer add ആയി കഴിഞ്ഞു.
ഇതേ രീതിയില് share ചെയ്ത windows printer നെ network printer ആയി add ചെയ്യാം
File Sharing ( Connect to sever)
Places–Connect to server എന്ന option select ചെയ്യുക.
ഇപ്പോള് കിട്ടുന്ന ജാലകത്തില് service type SSH select ചെയ്യുക.
Server എന്ന option ന് നേര്ക്ക് connect ചെയ്യാനുളള computer ന്റെ IP address type ചെയ്യുക. connect ബട്ടണ് അമര്ത്തുക.
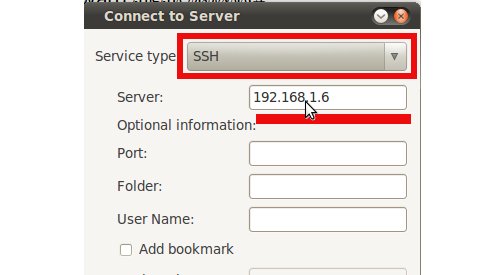

Connect ചെയ്യാനുളള computer ന്റെ user name ഉം password ഉം type ചെയ്ത് login ചെയ്യുക.
 File
sharing ( Windows & Linux) samba വഴി
File
sharing ( Windows & Linux) samba വഴി- Windows ഉം Linux ഉം തമ്മില് file, printer തുടങ്ങിയവ share ചെയ്യാന് ഉപയോഗിക്കുന്ന ഒരു free software ആണ് samba .
- Synaptic package manager വഴി computer ല് samba install ചെയ്തിട്ടുണ്ടോ എന്ന് പരീശോധിക്കുക.
- ഇല്ലായെങ്കില്
internet connect ചെയ്ത
computer കളില്
terminal ല്
sudo apt-get install samba smbfs എന്ന്
type ചെയ്ത്
enter അമര്ത്തുക
Terminal ല് nautilus smb://IP address (file access ചെയ്യാനുളള computer ന്റെ IP address) type ചെയ്ത് enter അമര്ത്തുക
Eg : nautilus smb://192.168.0.1
ഇപ്പോള് പുതിയൊരു nautilus ജാലകത്തില് share ചെയ്ത windows file കള് കാണാം.
windows ല് നല്കിയിരിക്കുന്ന sharing option ന് അനുസരിച്ച് ഈ file കളെ മാറ്റം വരുത്താന് സാധിക്കും.
UBUNTU – UBUNTU File sharing
Ubuntu വില് folder ന് sharing permission നല്കുന്നതിന്
share ചെയ്യാനുളള folder ല് right button അമര്ത്തി sharing option select ചെയ്യുക. ( sharing option ലഭിക്കണമെങ്കില് computer ല് samba install ചെയ്തിരിക്കണം) folder ന് അവശ്യമായ sharing option കള് നല്കി create share button അമര്ത്തുക.
Terminal ല് nautilus smb://ip address (file access ചെയ്യാനുളള computer ന്റെ IP address) type ചെയ്ത് enter അമര്ത്തുക
Eg : nautilus smb”//192.168.0.1
ഇപ്പോള് പുതിയൊരു nautilus ജാലകത്തില് share ചെയ്ത file കള് കാണാം.
Remote Desktop
മറ്റ് computer കളുടെ Desktop കാണുന്നതിനും നിയന്ത്രിക്കുന്നതിനും സഹായിക്കുന്ന സങ്കേതമാണ് ' Remote Desktop'. ഇത് പ്രവര്ത്തനക്ഷമമാക്കുന്നതിന് രണ്ട് ഘട്ടങ്ങളുണ്ട്.
ഡെമോണ്സ്റ്റ്രേഷന് നടത്തുന്ന computer ലെ മറ്റ് computer കള്ക്ക് കാണാന് അനുവദിക്കല്
System–Preferences–Remote Desktop തിരഞ്ഞെടുക്കുക.
Allow other users to view your desktop ടിക്ക് ചെയ്യുക.
ഈ computer ല് ചെയ്യുന്ന പ്രവര്ത്തനങ്ങള് മറ്റ് computer കളില് നിന്നും നിയന്ത്രിക്കുവാന് അനുവാദം കൊടുക്കുന്നതിന് " Allow other users to control your Desktop" ടിക്ക് ചെയ്യുക.
Security option ല് അവശ്യമായ മാറ്റങ്ങള് വരുത്തുക.
ഡെമോണ്സ്റ്റ്രേഷന് കാണേണ്ട computer ല് " Remote Desktop “ ദൃശ്യമാക്കുന്നതിനുളള program പ്രവര്ത്തിപ്പിക്കല്
Terminal തുറന്ന് vncviewer IP address എന്ന് type ചെയ്ത് enter അമര്ത്തുക
Eg : vncviewer 192.168.0.3
പുതിയ ജാലകത്തില് network ല് ഉള്പ്പെട്ട , നിങ്ങള് ആവശ്യപ്പെട്ട computer ന്റെ Desktop കാണാം.
(computer ല് vncviewer install ചെയ്തിരിക്കണം)
*******************************
*********************************
HOW TO merge couple of pdf into one
sudo apt-get install pdftk
Now you can merge pdf files by putting them in the same directory and typing:
pdftk 1.pdf 2.pdf 3.pdf cat output merged.pdf
or if you wish to merge files in alphabetical order you can simply type:
pdftk *.pdf cat output merged.pdf
Here are some more examples how to use pdftk:
(Using Handles):
pdftk A=1.pdf B=2.pdf cat A B output 12.pdf
Split Select Pages from Multiple PDFs into a New Document
pdftk A=one.pdf B=two.pdf cat A1-7 B1-5 A8 output combined.pdf
Encrypt a PDF using 128-Bit Strength (the Default) and Withhold All Permissions (the Default)
pdftk mydoc.pdf output mydoc.128.pdf owner_pw foopass
Same as Above, Except a Password is Required to Open the PDF
pdftk mydoc.pdf output mydoc.128.pdf owner_pw foo user_pw baz
Same as Above, Except Printing is Allowed (after the PDF is Open)
pdftk mydoc.pdf output mydoc.128.pdf owner_pw foo user_pw baz allow printing
Decrypt a PDF
pdftk secured.pdf input_pw foopass output unsecured.pdf
Join Two Files, One of Which is Encrypted (the Output is Not Encrypted)
pdftk A=secured.pdf mydoc.pdf input_pw A=foopass cat output combined.pdf
Uncompress PDF Page Streams for Editing the PDF Code in a Text Editor
pdftk mydoc.pdf output mydoc.clear.pdf uncompress
Repair a PDF's Corrupted XREF Table and Stream Lengths (If Possible)
pdftk broken.pdf output fixed.pdf
Burst a Single PDF Document into Single Pages and Report its Data to doc_data.txt
pdftk mydoc.pdf burst
Report on PDF Document Metadata, Bookmarks and Page Labels
pdftk mydoc.pdf dump_data output report.txt
I found these on this link.
***********************************
Convert multiple image files to single PDF (Batch convert image to PDF) in Ubuntu
1. Install imagemagick from Ubuntu Software CenterOr, in the terminal:2. Put all your image files in a single directory.
sudo apt-get install imagemagick
3. Open a terminal and go to this directory:
cd
4. Enter following command:convert * output.pdf
Where output.pdf is the desired single PDF file. It’s easier than those methods in windows, isn’t it? How to convert PDF to Image?
|
pdftoppm -png file.pdf prefix
prefix-01.png etc. for each page.convert -geometry 1600x1600 -density 200x200 -quality 100 file.pdf file.jpg
*************************
5 Excellent Downloadable eBooks To Teach Yourself Linux
Introduction to Linux – A Hands on Guide
(Download)
GNU/Linux Command line tools Summary
(Download)
Ubuntu Pocket Guide and Reference
(Download)
Rute User’s Tutorial and Exposition
(Download)
Ubuntu Tips: What is a Timed Login In Ubuntu or Kubuntu ?
Question: What is a timed login in Ubuntu or Kubuntu ? How does it work?
Answer: If you have created a guest account on your
laptop, you may want the guest account to automatically login when you
reboot the machine.
But, wait. You don’t want that guest account to login automatically when you want to login using your account.
The guest account should login automatically only when you don’t login with your username.
So, here comes the timed login concept. When you enable a timed
login on guest account, you’ll still get a login prompt after reboot.
If you don’t enter a username and password within X number of seconds,
then the guest account will be used to login automatically.
You can enable timed login in Ubuntu using following 3 steps.
Note: Please understand that it is not security
best practices to enable the timed login. You may like this feature if
you have a system that doesn’t have any sensitive information and you
and your family, friends use it only to browse internet. On those
systems, you may want to setup a guest account and enable timed login
for guest account as explained below.
Step 1: Launch GDM Login Window in Ubuntu
Press Alt + F2 and enter gksu /usr/sbin/gdmsetup in the run
application window as shown below. This will launch the GDM Login
Window.
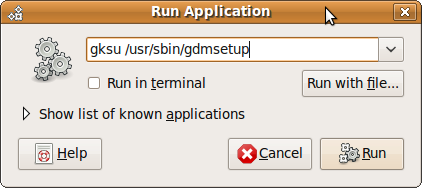
Fig: Press Alt+F2 to invoke Run Application window
(or) Click on System -> Administration -> Login Window, as shown below.

Fig: Login Window Selection
Step 2: Enter Administrator Password
This will prompt for the administrator (root) password as shown below.
Fig: Enter Administrator Password to Launch Login Window

Fig: Enter Administrator Password to Launch Login Window
Step 3: Go to Security Tab and Enable Timed Login
In the login window preferences select the Security tab. Select the
check box Enable Timed login, and then select the user to be
automatically logged in from the drop down box. And also select how
much time you wanted the system to be paused before login.
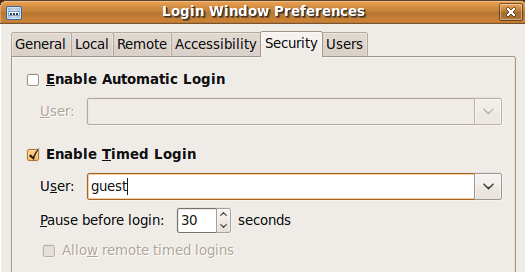
Fig: Ubuntu Timed Login Without Userid and Password
Ubuntu Timed login setup is done. After this change, whenever you
boot the system it waits in the login window. If you don’t do any
activity for the specified time (30 seconds in the above example), then
it will be automatically login to the specified user account. When you
want to login in a different account also, you can do by typing the
user name and password in the login window before the specified seconds.
If you are looking for automatic login then have a look at our earlier article Ubuntu Tips: How to Login Without Entering Username and Password.
One of the Usage: When you have guests in your
home and if you are not around, they may call you and ask for user name
and password to login to your computer. To avoid this, you can create a
guest login and make it as a timed login user. This way after the
reboot, your friend may have to wait for 30 seconds before the system
automatically login. At the same time, when you are using the computer,
you still have 30 seconds before which you can login using your
username and password.
Ubuntu Tips: How To Use Windows Applications in Linux Desktop Distributions
Question: How to run Windows applications in Ubuntu or any other Linux desktop distribution ?
Answer: Install wine project, which will enable you to use Windows applications in Linux systems.
What is Wine ?
Using Wine you can execute Windows application like Microsoft Word,
Excel, PowerPoint etc., in your Linux. Currently, 12,000+ Windows
applications can run in Ubuntu with Wine.
How To Install Wine in Ubuntu ?
Wine is a pretty big package which may take some time for the
installation to complete, especially if you are on a slower internet
connection.
$ sudo apt-get install wine
How to Install Your Favorite Windows Application ?
You can install Wine using one of the following two methods.
Method 1: Default Installation
Search and download the wine compatible Windows application from WineHQ website.
- Go to winehq.org
- Select AppDB in the top menu
- Select the Browse Apps in the left side bar
Locate and download the required application. Double click on that
downloaded application, which should let you use the application. If it
gives any one of the following error messages, go to Method 2 to
install it again.
- Unable to find volume for extraction
- Permission denied
Every application has a rating available to it. For example, if it
has Platinum rating, you should not have any issues with the default
installation. Maintainer Ratings definition gives information about all available ratings.
Method 2: Install Using Winetricks
Install cabextract: Cabextract is required by winetricks.
$ sudo apt-get install cabextract
Install winetricks: Download the latest winetricks.
$ wget http://winezeug.googlecode.com/svn/trunk/winetricks
Launch winetricks as shown below. The following example will install Microsoft Internet Explorer on Linux.
$ sh winetricks ie6
The following images shows Microsoft Internet Explorer browser on Ubuntu Laptop.

Fig: Microsoft Internet Explorer Browser on Ubuntu Laptop
Winetricks Usage
Following will give you a graphical interface that will walk you through step-by-step in installing a Windows application.
$ sh winetricks
How To Manage Packages Using apt-get, apt-cache, apt-file and dpkg Commands ( With 13 Practical Examples )
Debian based systems (including Ubuntu) uses apt-* commands for managing packages from the command line.
In this article, using Apache 2 installation as an example, let us
review how to use apt-* commands to view, install, remove, or upgrade
packages.
1. apt-cache search: Search Repository Using Package Name
If you are installing Apache 2, you may guess that the package name
is apache2. To verify whether it is a valid package name, you may want
to search the repository for that particular package name as shown
below.
The following example shows how to search the repository for a specific package name.
$ apt-cache search ^apache2$
apache2 - Apache HTTP Server metapackage
2. apt-cache search: Search Repository Using Package Description
If you don’t know the exact name of the package, you can still search using the package description as shown below.
$ apt-cache search "Apache HTTP Server"
apache2 - Apache HTTP Server metapackage
apache2-doc - Apache HTTP Server documentation
apache2-mpm-event - Apache HTTP Server - event driven model
apache2-mpm-prefork - Apache HTTP Server - traditional non-threaded model
apache2-mpm-worker - Apache HTTP Server - high speed threaded model
apache2.2-common - Apache HTTP Server common files
3. apt-file search: Search Repository Using a Filename from the Package
Sometimes you may know the configuration file name (or) the executable name from the package that you would like to install.
The following example shows that apache2.conf file is part of the
apache2.2-common package. Search the repository with a configuration
file name using apt-file command as shown below.
$ apt-file search apache2.conf
apache2.2-common: /etc/apache2/apache2.conf
apache2.2-common: /usr/share/doc/apache2.2-common/examples/apache2/apache2.conf.gz
4. apt-cache show: Basic Information About a Package
Following example displays basic information about apache2 package.
$ apt-cache show apache2
Package: apache2
Priority: optional
Maintainer: Ubuntu Core Developers
Original-Maintainer: Debian Apache Maintainers
Version: 2.2.11-2ubuntu2.3
Depends: apache2-mpm-worker (>= 2.2.11-2ubuntu2.3)
 | apache2-mpm-prefork (>= 2.2.11-2ubuntu2.3)
 | apache2-mpm-event (>= 2.2.11-2ubuntu2.3)
Filename: pool/main/a/apache2/apache2_2.2.11-2ubuntu2.3_all.deb
Size: 46350
Description: Apache HTTP Server metapackage
 The Apache Software Foundation's goal is to build a secure, efficient and
 extensible HTTP server as standards-compliant open source software.
Homepage: http://httpd.apache.org/
5. apt-cache showpkg: Detailed Information About a Package
“apt-cache show” displays basic information about a package. Use
“apt-cache showpkg” to display detailed information about a package as
shown below.
$ apt-cache showpkg apache2
Package: apache2
Versions:
2.2.11-2ubuntu2.3 (/var/lib/apt/lists/us.archive.ubuntu.com_ubuntu_dists_jaunty-updates_main_binary-i386_Packages) (/var/lib/apt/lists/security.ubuntu.com_ubuntu_dists_jaunty-security_main_binary-i386_Packages)
 Description Language:
                 File: /var/lib/apt/lists/us.archive.ubuntu.com_ubuntu_dists_jaunty-updates_main_binary-i386_Packages
                  MD5: d24f049cd70ccfc178dd8974e4b1ed01
Reverse Depends:
  squirrelmail,apache2
  squid3-cgi,apache2
  phpmyadmin,apache2
  mahara-apache2,apache2
  ipplan,apache2
Dependencies:
  2.2.11-2ubuntu2.3 - apache2-mpm-worker (18 2.2.11-2ubuntu2.3) apache2-mpm-prefork (18 2.2.11-2ubuntu2.3) apache2-mpm-event (2 2.2.11-2ubuntu2.3)
  2.2.11-2ubuntu2 - apache2-mpm-worker (18 2.2.11-2ubuntu2) apache2-mpm-prefork (18 2.2.11-2ubuntu2) apache2-mpm-event (2 2.2.11-2ubuntu2)
Provides:  2.2.11-2ubuntu2.3 -
  2.2.11-2ubuntu2 -
Reverse Provides:  apache2-mpm-itk 2.2.6-02-1build4.3
  apache2-mpm-worker 2.2.11-2ubuntu2.3
  apache2-mpm-prefork 2.2.11-2ubuntu2.3
  apache2-mpm-prefork 2.2.11-2ubuntu2
  apache2-mpm-event 2.2.11-2ubuntu2
6. apt-file list: List all the Files Located Inside a Package
Use “apt-file list” to display all the files located inside the apache2 package as shown below.
$ apt-file list apache2 | more
apache2: /usr/share/bug/apache2/control
apache2: /usr/share/bug/apache2/script
apache2: /usr/share/doc/apache2/NEWS.Debian.gz
apache2: /usr/share/doc/apache2/README.Debian.gz
apache2: /usr/share/doc/apache2/changelog.Debian.gz
...
7. apt-cache depends: List all Dependent Packages
Before installation, if you like to view all the dependent packages, use “apt-cache depends” as shown below.
$ apt-cache depends apache2
apache2
 |Depends: apache2-mpm-worker
 |Depends: apache2-mpm-prefork
  Depends: apache2-mpm-event
8. dpkg -l: Is the Package Already Installed?
Before installing a package, you may want to make sure it is not already installed as shown below using dpkg -l command.
$ dpkg -l | grep -i apache
9. apt-get install: Install a Package
Finally, install the package using “apt-get install” as shown below.
$ sudo apt-get install apache2
[sudo] password for ramesh:

The following NEW packages will be installed:
  apache2 apache2-mpm-worker apache2-utils apache2.2-common libapr1
  libaprutil1 libpq5

0 upgraded, 7 newly installed, 0 to remove and 26 not upgraded.
10. dpkg -l : Verify Whether the Package got Successfully Installed
After installing the package, use “dpkg -l” to make sure it got installed successfully.
$ dpkg -l | grep apacheii  apache2             2.2.11-2ubuntu2.3  Apache HTTP Server metapackage
ii  apache2-mpm-worker  2.2.11-2ubuntu2.3  Apache HTTP Server - high speed threaded mod
ii  apache2-utils       2.2.11-2ubuntu2.3  utility programs for webservers
ii  apache2.2-common    2.2.11-2ubuntu2.3  Apache HTTP Server common files
11. apt-get remove: Delete a Package
Use “apt-get purge” or “apt-get remove” to delete a package as shown below.
$ sudo apt-get purge apache2
(or)

$ sudo apt-get remove apache2

The following packages were automatically installed and are no longer required:
  apache2-utils linux-headers-2.6.28-11 libapr1 apache2.2-common
  linux-headers-2.6.28-11-generic apache2-mpm-worker libpq5 libaprutil1

Use 'apt-get autoremove' to remove them.
The following packages will be REMOVED:
  apache2
0 upgraded, 0 newly installed, 1 to remove and 26 not upgraded.
Removing apache2 ...
- apt-get remove will not delete the configuration files of the package
- apt-get purge will delete the configuration files of the package
12. apt-get -u install: Upgrade a Specific Package
The following example shows how to upgrade one specific package.
$ sudo apt-get -u install apache2
Reading package lists... Done
Building dependency tree
Reading state information... Done
apache2 is already the newest version.
The following packages were automatically installed and are no longer required:
  linux-headers-2.6.28-11 linux-headers-2.6.28-11-generic
Use 'apt-get autoremove' to remove them.
0 upgraded, 0 newly installed, 0 to remove and 26 not upgraded.
13. apt-get -u upgrade: Upgrade all Packages
To upgrade all the packages to it’s latest version, use “apt-get -u upgrade” as shown below.
$ sudo apt-get -u upgrade
The following packages will be upgraded:
  libglib2.0-0 libglib2.0-data libicu38 libsmbclient libwbclient0
  openoffice.org-base-core openoffice.org-calc openoffice.org-common
  openoffice.org-core openoffice.org-draw openoffice.org-emailmerge
  openoffice.org-gnome openoffice.org-gtk openoffice.org-impress
  openoffice.org-math openoffice.org-style-human openoffice.org-writer
  python-uno samba-common smbclient ttf-opensymbol tzdata
26 upgraded, 0 newly installed, 0 to remove and 0 not upgraded.
How To Change Password On Ubuntu
1. Ubuntu Change Password from GUI
Launch Change Password Window by clicking on “System -> Preferences -> About Me”, which will display the following window. Click on ‘Change Password’ button in this window.
Enter Current Password: In the change password window, enter your current password and click on ‘Authenticate’.

Enter New Password: Once you enter the current password, the new password text field will be enabled. Enter your new password and click on ‘Change Password’.

2. Ubuntu Change Password from Command Line
Change your account password using the passwd command as shown below. Following example changes the password of the current logged-in user.ramesh@ramesh-desktop:~$ passwd
Changing password for ramesh.
(current) UNIX password:
Enter new UNIX password:
Retype new UNIX password:
passwd: password updated successfully
If you want to change password for another Ubuntu user, use the
following method. Following example changes the password of user
jsmith, from user ramesh.
ramesh@ramesh-desktop:~$ sudo passwd jsmith
Enter new UNIX password:
Retype new UNIX password:
passwd: password updated successfully
Ubuntu Tips: Graphical Monitoring for Processes, Memory, Load Average, and Disk Usage
Similar to Windows Task Manager, Ubuntu offers a
system monitoring utility that will display running processes, memory
usage, file system usage. Apart from monitoring, you can also take
several actions from the system monitor user interface — such as
killing a running process.
In this article, let us review how to put the basic monitoring options right on the task bar panel on Ubuntu desktop.
Add System Monitor to Ubuntu Task Bar Panel
Right click on the task bar panel and click on ‘Add to Panel’ as shown below.

Fig: Launch – Add to Panel
Search for the term “system” -> select “System Monitor” and -> click on “Add” as shown below.
 Fig: Search System Monitor and add to Panel
By default this will only add the processes usage graph as shown below.
 Fig: Processes Usage Graph on Ubuntu Task Bar Panel
Add Memory Usage, Load Average and Disk Usage Graphs to Ubuntu Task Bar Panel
Right mouse click on the Processes graph that is displayed on the
task bar panel, and select ‘Preferences’. Select the following
check-boxes under the ‘Monitored Resources’ section. You can also
choose Network, or Swap Space if you like to monitor those.
- Processor (already selected)
- Memory
- Load
- Harddisk
By default it displays the memory usage in green, cache in light
green, process usage in blue, load average in red. You can change the
colors, and the refresh interval.
 Fig: Ubuntu System Monitor Preferences
After the above selection, you’ll see 4 graphs in the Ubuntu task bar itself as shown below.
 Fig: Multiple graphs displayed on the Ubuntu task bar
Ubuntu System Monitor GUI
To view the system monitor in a bigger window, right click on any
one of the system monitor graphs in the task bar, and click on “Open
System Monitor”, which will display the System monitor in the bigger
window as shown below.
From the Processes tab, you can view all the process along with
their status, %CPU usage, memory used by the process etc., You can also
kill a process directly from here.
 Fig: Ubuntu System Monitor – Processes tab
The file systems tab displays the disk usages.
 Fig: Ubuntu System Monitor – File Systems tab
The resources tab displays last 60 seconds of data in three different graphs for CPU, Memory and Network.
 Fig: Ubuntu System Monitor – Resources tab
Customize the Panel
Ubuntu includes a top panel and a bottom panel by default. If you
prefer to keep only one panel at the bottom just like the Windows
Taskbar, then these are the steps to follow:
-
 Delete the bottom panel: right-click over it and click "Delete This Panel".
 - Move the top panel to bottom: right-click over it, select "Properties" and change Orientation from "Top" to "Bottom".
- Add running program buttons: right-click the panel, select "Add to Panel", scroll down and select "Window List", click "Add".
-
Replace the Menu Bar ("Applications-Places-System") with the "Main Menu" to save space in the panel:
- Right-click the "Menu Bar" and select "Remove From Panel".
- Right-click the panel, select "Add to Panel" and choose "Main Menu", click "Add".
- Right-click the items (Firefox, etc) and untick "Lock to Panel".
- Right-click the added "Main Menu", select "Move" to relocate it to the far left.

These are basic changes. The panels are much more flexible than the
Windows Taskbar in that many items in the panels can be easily added,
removed or configured.
- sudo gconftool-2 --shutdown
- sudo rm -rf .gconf/apps/panel
- sudo pkill gnome-panel
Frequently used programs can be easily pinned to the panel.
- Browse to the program from "Applications" or "Main Menu".
- Drag and drop the program to an empty space in the panel, or right-click the program and select "Add this launcher to panel".
- Right click the program icon, select "Move" and drop it to a new place in the panel.
- Right click the program icon and select "Lock to Panel".
See also "Enable Superbar".
When you set the panel to be transparent in the default Ambiance
theme in Ubuntu, you will find that some panel items' backgrounds are
not transparent, but you can make them transparent and consistent with
others, following these steps:
-
 Go to Applications (or Main Menu) > Accessories > Terminal.
 - Enter cp -R /usr/share/themes/Ambiance ~/.themes/
- Enter gedit ~/.themes/Ambiance/gtk-2.0/apps/gnome-panel.rc (for Ubuntu 11.04 or 10.10) OR gedit ~/.themes/Ambiance/gtk-2.0/gtkrc (for Ubuntu 10.04), to open the file with gedit.
- Search for this line bg_pixmap[NORMAL] = "img/panel.png" (for Ubuntu 11.04 or 10.10) OR bg_pixmap[NORMAL] = "panel_bg.png" (for Ubuntu 10.04)
-
 Comment out the line by placing a # at the beginning of the line, like this: # bg_pixmap[NORMAL] = ...
 - Save the file.
- Go to System > Preferences > Appearance, switch to the other theme and then back to the Ambiance theme.
In Windows 7, frequently used programs can be pinned to the taskbar
(hence called Superbar). Likewise, DockBarX, a Gnome panel plugin, can
be added to Ubuntu to achieve almost the same effect to pin and unpin
or launch the applications from the panel.
-
 Go to Ubuntu Software Center > Edit > Software Source.
 - Select "Other Software" and click "Add"
- At APT line, enter ppa:dockbar-main/ppa, click "Add Source" and "Close"
- At the left panel of Ubuntu Software Center, select "PPA for Dockbar Main Group", which is added after the above steps
- At the right panel, select DockbarX and click "Install"
- Wait for the cache to be updated, then right click the panel and click “Add to Panel”.
- Select the DockBarX Applet and click "Add".
The font type and color of the panel clock follow the windows text
in a theme by default. In particular, if the font color is black and
shown on a dark background through a transparent panel, you can't read
the clock clearly, but you can tweak it by changing the font color. And
you can define the font type for your panel clock as well.
The code in Step 1 below sets the font color to white and applies DS-Digital font (See  below), bold and size 16.
-
 Open up the text editor Gedit and paste the following code:
style "my-panel-clock"
{
fg[NORMAL] = "#FFFFFF"
font_name = "DS-Digital Bold 16"
}
widget "*.clock-applet-button.*" style "my-panel-clock" - Save the file as .gtkrc-2.0 (including the dot in front of the filename) inside your home directory /home/your_user_name.
- Log out and log back in (OR enter killall gnome-panel into the Terminal) to see the change.
If your Ubuntu system sets the Minimize, Maximize and Close buttons
to the left in a window and you prefer to change them to the right,
then follow these simple steps:
-
 Press Alt+F2 to bring up "Run Application" window.
 - Type gconf-editor into the box, click "Run" to bring up Configuration Editor.
- Browse to apps > metacity > general, look for "button_layout" on the right panel.
- Change the value in the "button_layout" from close,minimize,maximize: to menu:minimize,maximize,close and press the Enter key.
When running an application without maximized, Ubuntu always puts it
in the left-top corner of the desktop by default, but you are allowed
to set a program window to open up in the center of the desktop area.
-
 Go to System > Preferences > CompizConfig Settings Manager
 - Select "Windows Management" from the left panel.
- Click "Place Windows".
- Change Placement Mode from "Smart" to "Centered", click "Back" and "Close".

Ideally, the window manager in Ubuntu should restore the last known
position of an application window, but it does not do that unless an
application remembers its own window position. (See reported bugs)
When you double-click the title bar of a window, the default setting
is to maximize a window. Since there's already a maximize button you
can use for this, I always like to change the default setting to
rolling up (or 'shading') a window when I double-click on its title bar.

- Go to System > Preferences > Windows
- In "Titlebar Action", select "Roll up" (or "Shade" where applicable), from the drop-down list.
Now you can roll up a window when you double-click its title bar,
and roll it down by double-clicking the title bar again. Simple as that.
Themes in Ubuntu can be customized to match the applications or suit
your needs. I once tried the "New Wave" theme and the menu (File, Edit,
View, etc) was hardly visible on the dark background in OpenOffice, but
customizing the "New Wave" theme with "Ambiance" Controls solved the
problem. These are easy steps to customize a theme, for example,
allowing the "New Wave" theme to mix with the "Ambiance" Controls.
-
 Go To System > Preferences > Appearance.
 - Under the "Theme" tab, click the "Customize" button while the "New Wave" theme is selected.
- Under the "Controls" tab, click any other control item such as "Ambiance" and click the "Close" button.
- Now it becomes your Custom theme and you can save it as a new theme, such as "New Wave with Ambiance Controls".

In Ubuntu you can set nearly the same aero glass effect to window borders with alpha transparency as available in Windows 7.
-
 Press Alt+F2 to bring up "Run Application" window.
 - Type gconf-editor into the box, click "Run" to bring up Configuration Editor.
- Browse to apps > gwd, look for "metacity_theme_active_opacity" on the right panel.
- Change the value in "metacity_theme_active_opacity" from 1 to 0.75 (or smaller such as 0.5 for more transparency).
- Then go to System > Preferences > CompizConfig Settings Manager
- Select "Effects" from the left panel.
- Tick "Blur Windows" and click the "Close" button. (Note: default values in Blur Windows can be applied.)
In Windows 7, you can click and drag a window to the left or right
edge of the desktop and it will fill half of the screen, or snap a
window to the top edge of the desktop and it will be maximized.
In Ubuntu 11.04, you can click and drag a window to the left, right
or top edge of the desktop to achieve the same result, but in Ubuntu
10.10 or 10.04, you need some tweaking as follows.
-
In addition to CompizConfig Settings Manager, install WmCtrl if not added.
- Go to Applications (or Main Menu) > Accessories > Terminal.
- Enter sudo apt-get install wmctrl
- Enter password when prompted.
- Go To System > Preferences > CompizConfig Settings Manager.
- Select "General" from the left panel and click "Commands".
-
In Command line 0, 1 and 2, paste the following codes:
- Command line 0, paste WIDTH=`xdpyinfo | grep 'dimensions:' | cut -f 2 -d ':' | cut -f 1 -d 'x'` && HALF=$(($WIDTH/2)) && wmctrl -r :ACTIVE: -b add,maximized_vert && wmctrl -r :ACTIVE: -e 0,0,0,$HALF,-1
- Command line 1, paste WIDTH=`xdpyinfo | grep 'dimensions:' | cut -f 2 -d ':' | cut -f 1 -d 'x'` && HALF=$(($WIDTH/2)) && wmctrl -r :ACTIVE: -b add,maximized_vert && wmctrl -r :ACTIVE: -e 0,$HALF,0,$HALF,-1
- Command line 2, paste wmctrl -r :ACTIVE: -b add,maximized_vert,maximized_horz
- In the same window, click "Edge Bindings" tab.
- Change Run Command 0, 1 and 2 from "None" to "Left", "Right" and "Top" respectively.
- Click "Back" button and select "General Options", change "Edge Trigger Delay" to about 500.
Ubuntu adds an icon to the desktop for every removable drive that
you attach to your system. The icons can be hidden by these steps:
- Press Alt+F2 to bring up "Run Application" window.
- Type gconf-editor into the box, click "Run" to bring up Configuration Editor.
- Browse to apps > nautilus > desktop.
- Untick "volumes_visible" and close the window.
The drive icons would then disappear from the desktop. Remember that you can always access the drives from "Places".
You can right click your desktop, select "Change Desktop Background"
and choose any one of the wallpapers pre-installed, but you need to do
it each time you want to change a wallpaper. What about changing a
wallpaper automatically within a certain time interval? Try Wally.
-
 Go to Applications (or Main Menu) > Ubuntu Software Center, enter wally into the Search box and click "Install". (See below.)
 - Press Alt-F2, enter wally and click the "Run" button.
- Right-click the Wally icon on the panel, select Settings.
- Click "Folders" in the left column, then add /usr/share/backgrounds to the Folder box and tick "Include subfolders".
- Click "Settings" in the left column, then tick "Play automatically on application starts".
- Set the application to auto start, using this tip Auto Start Up an Application (as Wally's option to "Start automatically when system starts" being disabled).

Your wallpaper on the desktop will automatically change following
these basic settings when you log back in the system (or right click
the Wally icon on the panel and select "Play").
Keyboard shortcuts are preset in the system, but you can add new
ones or change them easily. For instance, change the default shortcut
Ctrl+Alt+T (Run a Terminal) to Win+R (press R while holding down the
Windows key, also known as Super key) by the following steps:
-
 Go To System > Preferences > Keyboard Shortcuts
 - Browse to Desktop > "Run a terminal"
- Click on the Shortcut, and it shows "New shortcut..."
- Press Win+R, and it shows Mod4+R
- Click the Close button and try the new shortcut.

Xkill is part of the X11 utilities pre-installed in Ubuntu and a
tool for terminating misbehaving X clients or unresponsive programs.
You can easily add a shortcut key to launch xkill with the steps below.
-
 Go to System > Preferences > Keyboard Shortcuts.
 - Click the Add button to create a custom shortcut.
- Enter xkill to both the Name and Command boxes and click the Apply button.
- Click on Disabled at the xkill row in the Keyboard Shortcuts window (Disabled is then changed to New shortcut...).
- Press a new key combination, e.g. Ctrl+Alt+X (New shortcut... is then changed to Ctrl+Alt+X).
- Click the Close button.
Xkill is ready for use. Press the above key combination to turn the
cursor to an X-sign, move the X-sign and drop it into a program
interface to terminate the unresponsive program, or cancel the X-sign
with a right-click.
If you press Ctrl+Alt+Delete, Ubuntu brings you a menu to shut down,
restart, or suspend your system. But for some reason you might
encounter that the system freezes, the mouse cursor can't move, neither
pressing Ctrl+Alt+Delete can work.
Remember that there's a shortcut key Alt+PrintScreen+K that can
bring you back to the log-in screen immediately without the need to
reboot the system. That's a time saver.
As an alternative, you can also use Ctrl+Alt+Backspace to do the
same after you've enabled the shortcut key by the following steps:
- Go to System > Preferences > Keyboard.
- Select the “Layouts” tab and click the “Options” button.
- Select “Key sequence to kill the X server” and enable “Control + Alt + Backspace”.
Windows Explorer allows for users to set a default view to all
folders. In almost the same way, Ubuntu's Nautilus File Browser allows
for these settings:
-
 Go to "Places" and open a folder.
 - At the top of the File Browser, click "Edit" and "Preference".
- Under Default View, change "Icon View" to "List View", to see more details in columns.
- Tick "Show hidden and backup files" if that's your choice.

Other various settings, such as single or double click to open
items, icon captions, list columns, preview files and media handling
can be done in the same window as well.
In the Ubuntu file system, you can use Nautilus file manager to browse most files but can only write files in your home folder /home/your_name
and its sub-folders such as Desktop and Documents. If you have to
rename a folder or write files outside of your home folder using the
file manager, you won't be able to but you can create an advanced file
manager for this purpose.
-
 Go to System > Preferences > Main Menu
 - Select "Accessories" in the left panel and click "New Item" in the right panel.
- Enter a name such as Advanced Nautilus in the "Name" box.
- Enter gksu nautilus in the "Command" box.
- Click the "OK" button and the "Close" button.

Now you can go to Applications (or Main Menu) > Accessories and
see that the Advanced Nautilus is ready for use. But be careful since
you can use it to delete or change any files on your system.
When I first installed Ubuntu onto a PC with an integrated audio
device and tried to play a media file on a player, it had no sound. I
tried these simple steps in setting Sound Preferences and then it had
sound. It works for me for the audio device I have.
- Go to System > Preferences > Sound to bring up the Sound Preferences window.
- Under the Hardware tab, change Profile to Analog Stereo Duplex from the drop-down menu.
- Under the Output tab, change Connector to Analog Output (LFE)/Amplifier from the drop-down menu.
As the items available from the drop-down menus might differ
depending on the hardware devices detected by the system, you might
want to try other items in the menus to see if they work for your
devices. It might also help to check out the steps in Sound Troubleshooting from the Ubuntu Documentation.
Playing a media file in a proprietary format on a player might also
have no sound if the required codecs are not installed. In this case,
see Enable Media Playback in this article.
Each time when you login to Ubuntu, it plays a login sound. If you
don't like to listen to it each time you login, you can easily disable
it, or you can even change it to your favorite sound.
To disable the login sound:
- Go to System > Preferences > Startup Applications.
- Under the "Startup Programs" tab, untick "GNOME Login Sound"
- Click Close
To change the login sound, tick the above "GNOME Login Sound" if it's unticked, then follow these steps:
- Press Alt+F2 to bring up "Run Application" window.
- Paste gksu nautilus /usr/share/sounds/ubuntu/stereo into the box, click "Run" to open Nautilus in the right folder.
- Rename the original file desktop-login.ogg to another such as desktop-login-original.ogg for backup
- Copy your sound file in ogg format to the above folder and name the file as desktop-login.ogg
- Log out and log back in to listen to the new login sound.
Do you prefer Windows TrueType fonts to the default fonts installed by Ubuntu? The mscorefonts package containing most Microsoft fonts can be installed and configured easily in a few steps below:
-
 Go to Applications (or Main Menu) > Accessories > Terminal.
 - Paste sudo apt-get install ttf-mscorefonts-installer into the Terminal (by pressing Ctrl-Shift-V in the Terminal after copying the highlighted code).
- Go to System > Preferences > Appearance > Fonts.
- Click each of them, pick a font and size to configure for window title and so on.

- Press Alt+F2 to bring up "Run Application" window.
- Paste gksu nautilus /usr/share/fonts/truetype into the box, click "Run" to open Nautilus in the right folder.
- Create a new sub-folder and copy your files ending with .ttf into the sub-folder.
- Enter sudo fc-cache -f -v in the Terminal to rebuild the font information.
Ubuntu only includes completely free software by default and does
not configure proprietary media formats such as mp3 and mp4 'out of the
box'. The required codecs however can be easily installed for the
default player to playback these files following a few simple steps
below.
- Double click an mp3 file in a folder.
- Click "Search" button when the the default player shows up with a "Search for suitable plugin?" window.
- Click the "Install" and "Confirm" buttons to download and install the restricted software.
- Restart the player after the package files are installed.
You might need to do the same for other restricted media formats such as mp4 too.
Screenlets are small applications to represent things such as sticky
notes, clocks, calendars around on your desktop. You can launch a
pre-installed screenlet from Screenlet Manager, or install a new one
into the Manager for launching it. Here are the steps for installing
and launching a screenlet, for example, WaterMark System Information.
-
 Install Screenlets Manager if it has not been added.
- Go to Applications (or Main Menu) > Ubuntu Software Center.
- Enter screenlets in the Search Box.
- Select Screenlets, click the "Install" button.
- Download the screenlet "WaterMark System Information" to a folder.
- Go to Applications (or Main Menu) > Accessories > Screenlets.
- Click Install, select Install Screenlet and click OK.
- Browse to the folder, select the file downloaded and click "Open" to install the screenlet into the Screenlets Manager.
- Select the screenlet "WaterMark" and click "Launch/Add". (Tips: you can add more than one WaterMark screenlet and set it to display other system information.)
More screenlets are available for installation from screenlets.org.
Ubuntu may use OpenJDK by default, but I note that some web services
such as ezyZip.com might need the Sun Java Runtime Environment (JRE) to
be installed in the system for running the services properly. If you
would like to get the proprietary Sun Java packages for your system,
you can download and install them from the Canonical Partner Repository
with the steps below:
- Go to Applications (or Main Menu) > Accessories > Terminal.
- Enter sudo add-apt-repository "deb http://archive.canonical.com/ lucid partner" to add the partner repository.
- Enter sudo apt-get update to update the source list.
- Enter sudo apt-get install sun-java6-jre sun-java6-plugin sun-java6-fonts to download and install the Sun Java packages. (If asked to accept the Distributor License for Java (DLJ) terms, use the left/right key to navigate and select Yes, then press the Enter key for installation).
- Enter sudo java -version to check the version of the Java used in the system.
- Enter sudo update-alternatives --config java to choose the default Java for use in the system when necessary.
Ubuntu Software Center lets you search and get free
software. If an application you need is not included in the Center, you
can go to System > Administration > Synaptic Package Manager,
type in an application name to search and install a software package
from the repositories.
Alternatively, you can get the latest freeware applications by clicking the Install this now button from the GetDeb Repository after the getdeb package is installed with the instructions given.
See also our Best Free Software for Linux.
Ubuntu is capable of reading and writing files stored on Windows
formatted partitions, but partitions must be 'mounted' before they can
be accessed each time you start up the system. With these steps, you
can auto mount the drives or partitions without the need to manually
mount them for access.
-
 Install Storage Device Manager if it has not been added.
- Go to Applications (or Main Menu) > Ubuntu Software Center.
- Enter pysdm in the Search Box.
- Select Storage Device Manager, click the "Install" button.
- Go to System > Administration > Storage Device Manager.
- Extend the list of sda and select the sda you want to auto mount, click 'OK' to configure.
- Click the "Assistant" button.
- Uncheck "Mount file system in read only mode" and keep "The file system is mounted at boot time" checked.
- Click the "Mount", "Apply" then "Close" button, and restart the system.

In case you wish to remove the auto-mount of a certain drive or
partition, you can similarly use Storage Device Manager to do the
setting.
A USB storage device plugged into the system usually mounts
automatically, but if for some reasons it doesn't automount, it's
possible to manually mount it with these steps.
- Go to Applications (or Main Menu) > Accessories > Terminal.
- Enter sudo mkdir /media/usb to create a mount point called usb.
- Enter sudo fdisk -l to look for the USB drive already plugged in, let's say the drive you want to mount is /dev/sdb1.
-
Enter sudo mount -t vfat /dev/sdb1 /media/usb -o uid=1000,gid=100,utf8,dmask=027,fmask=137 to mount a USB drive formatted with FAT16 or FAT32 system. OR:
Enter sudo mount -t ntfs-3g /dev/sdb1 /media/usb to mount a USB drive formatted with NTFS system.
To unmount it, just enter sudo umount /media/usb in the Terminal.
Nautilus file manager shows the root directory as File System for your Ubuntu system partition. If you have other partitions (or volumes), it shows them as xx GB Filesystem if they’re not named or labelled.
Using Disk Utility is one of the effective ways to name a partition easily:
-
 Go to System > Administration > Disk Utility
 - Select the item Hard Disk.
- In the Volumes section, click a partition you want to label.
-
Click "Edit Filesystem Label" (See below)
- In the Label box, enter a name, e.g. Data-Disk, and click Apply.

The file manager should now show the partition label, such as Data-Disk, instead of xx GB Filesystem.
In Windows, you can place a program shortcut in a startup folder for
running a program automatically when the system starts. In Ubuntu, you
can do the same in this way:
-
 Go To System > Preferences > Startup Applications
 - Click the "Add" button.
- Name a program.
- Click the "Browse" button and navigate to File System > usr > bin, where programs are usually installed.
- Select a program, click the "Open" button followed by the "Add" button.

The above program will then be listed in additional startup
programs. Check if the program runs automatically by logging out and
back to the system.
Ubuntu allows you to manually set your system time and date, but you
can also activate the Network Time Protocol (NTP) support in the system
to automatically sync them with the Internet time servers as follows.
-
 Go to System > Preferences > Time & Date.
 - Click the lock icon to change settings.
- Select your time zone from the list.
- If the configuration type is "manual", change it to auto synchronize with the Internet server. (In Ubuntu 11.04, the default is set to auto.)
- Click "Install NTP support" when prompted with a dialog box. (Applicable to Ubuntu 10.10 & 10.04)
- Tick the time server(s) nearer to you. (Applicable to Ubuntu 10.10 & 10.04)
- Click the Close button.
When you next boot up the system with the Internet connection, your
system clock will then be synced with the Internet time servers.
After full installation, Ubuntu is set to be the default operating
system to boot up if no key is pressed within a few seconds on a
multi-boot system. You might want to set your preferred operating
system to boot up by default. This can be done easily with StartUp-Manager.
-
 Go to Applications (or Main Menu) > Accessories > Terminal.
 - Enter sudo apt-get install startupmanager (OR copy the highlighted code and, in the Terminal, press Ctrl-Shift-V to paste it).
- Enter password used upon installation of Ubuntu.
- Go to System > Administration > StartUp-Manager
- Enter the same password to perform pre-configuration tasks, which include searching bootloaders to operating systems.
- Select the default operating system from the pull-down menu, click "Close" to perform post-configuration tasks.

With StartUp-Manager, you can also do others such as manage Usplash
themes, adjust bootloader menu resolution or set timeout in seconds. Avoid changing timeout to 0 seconds if you need to select a system to boot up from a multi-boot menu.
Each time when Ubuntu updates to a new Linux kernel, the old one is
left behind and the boot menu gets longer. If your new Linux kernel
works well, it's safe to remove the old one and clean up the boot menu.
Do take these steps carefully as incorrect removal of the items can make your system unbootable.
- Go to Applications (or Main Menu) > Accessories > Terminal.
- Enter uname -r to print the Linux kernel version you're running (e.g. 2.6.32-22-generic).
- Go to System > Administration > Synaptic Package Manager.
- Click Status from the left panel and select Installed.
- Enter the main version number (e.g. 2.6.32) in the Search box.
- Right-click the items with smaller sub version number (e.g. 2.6.32-21) for older Linux kernel and select Mark for Complete Removal. The files for the older version to remove may include linux-headers-2.6.32-21, linux-headers-2.6.32-21-generic and linux-image-2.6.32-21-generic.
- Click Apply from the top panel.
- Click Apply again from the pop-up window to confirm removal of the marked packages. The boot menu will be cleaned up automatically after the removal is confirmed.
- sudo add-apt-repository ppa:danielrichter2007/grub-customizer
- sudo apt-get update
- sudo apt-get install grub-customizer
A simple command can be entered in the Terminal to schedule a time for the system to shut down.
- Go to Applications (or Main Menu) > Accessories > Terminal.
-
Enter sudo shutdown -h +m (replace m with the number of minutes, e.g. +60).
OR: enter sudo shutdown -h hh:mm (replace hh:mm with the time on the 24hr clock, e.g. 23:15). - Enter password and minimize the Terminal window.
The system will then shut down within the minutes or at the time specified. To cancel a scheduled time, enter sudo shutdown -c in the Terminal.
CompizConfig Settings Manager (ccsm), if not added yet, can be installed this way:
- Click "Applications" (or "Main Menu"), select "Ubuntu Software Center".
- Type ccsm into the Search box.
- Select "Advanced Desktop Effects Settings (ccsm)" and click the "Install" button.
- Enter the password used upon installation of Ubuntu.
*************************************************
Could not open lock file /var/lib/apt/lists/lock - open (13: Permission denied) or "unable to get exclusive lock"
in Terminal type su
give root password(if no root create root by typing sudo passwd root-givr passwords then su)
sudo rm /var/lib/dpkg/lock
sudo rm /var/cache/apt/archives/lock
sudo rm /var/lib/apt/lists/lock
then apt-get update
******************************************************
To redirect a your blogspot to another Blog or Website, just add a Meta Tag in the Header section of the blog as shown below:
- Search for:
<b:include data='blog' name='all-head-content'/> - Add this Meta Tag just after the above code:
<meta content="0;url=http://YOUR NEW URL HERE" http-equiv="refresh"/> - Then Save the Template. That’s all!

To clear the recent documents
To disable the recent documents feature,first create a file by following command in terminal
touch ~/.gtkrc-2.0
Then,edit the file by:
sudo gedit ~/.gtkrc-2.0
Add following,save and close the file
gtk-recent-files-max-age=0
Restart gnome,the recent documents won’t appear anymore.
________________________________________________________cant open synaptic Package manger (read more)
In a terminal try
_______________________________________________________
Code:
sudo dpkg --configure -a
If Add Printer not Found
________________________________________________________
Ubuntu Tips & Tricks
ഗ്രബ്ബ് ബൂട്ട് ഓഡര് മാറ്റുന്ന വിധം - ഉബുണ്ടു 9.10 വില്
ഉബുണ്ടു 9.10 ല് ഗ്രബ്ബ് 2 ആണ് ബൂട്ട് ലോഡറായി ഉപയോഗിക്കുന്നത്. menu.lst ക്ക് പകരം grub.cfg എന്ന automatic ആയി നിര് മ്മിക്കപ്പെടുന്ന ഫയല് ആണ് ഗ്രബിനെ നിയന്ത്രിക്കുന്നത്. ഇതിന് മാറ്റങ്ങള് വരുത്താന് സധാരണ ഉപ്യോക്താവിന് കഴിയാത്തതിനാല് Root ആയി ലോഗിന് ചെയ്തശേഷം Computer Icon ല് Double Click ചെയ്യുക.

File System icon ല് Double Click ചെയ്യുക.

Etc folder double click ചെയ്യുക

Grub.d Folder Double Click ചെയ്യുക
അപ്പേള് തുറന്നുവരുന്ന folder ലെ
* 00_header
* 05_debian_theme
* 10_linux
* 20_memtest86+
* 30_os-prober
* 40_custom
എന്നീ ഫയലുകളാണ് grub നെ നിയന്ത്രിക്കുന്നത്
ഇതിലെ 10_linux Ubuntu ഉം 30_os-prober Windows XP/windows 7 യും ആണ്
boot order മാറാന് 10_linux എന്ന ഫയലില് ക്ലിക്ക് ചെയ്ത ശേഷം keyboard ലെ F2 എന്ന് key Press ചെയ്യുക(അല്ലങ്കില് Right Click->Rename) 10_linux മാറ്റി 20_linux എന്നാക്കുക.
30_os-prober Rename ചെയ്ത് 10_os-prober എന്നാക്കുക.
20_memtest86+ Rename ചെയ്ത് 30_memtest86+ എന്നാക്കുക.

--------------------------------------------------------------------------------------------------------
sudo apt-get install -fചെയ്യാന് ശ്രമിച്ചപ്പോള് Reading package lists... Error!
E: Unable to parse package file /var/lib/apt/lists/in.archive.ubuntu.com_ubuntu_dists_karmic_universe_binary-i386_Packages (1)
E: The package lists or status file could not be parsed or opened.എന്ന message വന്നു.
Software index is broken എന്നും കാണുന്നു.
please help
First please make sure to close all open programs, including all package managers like Synaptic, Add/remove programs, etc ...
Then please try this procedure:
Step 1: Open Terminal from "Applications-
Terminal"
Terminal"
Step 2: Please COPY-PASTE each line below into the Terminal then hit <enter> after each line)
sudo cp -arf /var/lib/dpkg /var/lib/
sudo cp /var/lib/
sudo cp /var/lib/
sudo rm -rf /var/lib/
sudo rm /var/lib/
sudo mkdir /var/lib/
sudo aptitude clean
sudo aptitude autoclean
sudo apt-get update
sudo dpkg --clear-avail
sudo dpkg --configure -a
sudo aptitude install -f
sudo aptitude update
sudo aptitude dist-upgrade
sudo cp /var/lib/
sudo cp /var/lib/
sudo rm -rf /var/lib/
sudo rm /var/lib/
sudo mkdir /var/lib/
sudo aptitude clean
sudo aptitude autoclean
sudo apt-get update
sudo dpkg --clear-avail
sudo dpkg --configure -a
sudo aptitude install -f
sudo aptitude update
sudo aptitude dist-upgrade
Step 3: Please post results (copy/paste terminal output from each command) on this thread
Hope it helps,
**********************************************************************
സ്ക്കൂള് internet കണക്ഷനില് ദുരുപയോഗപ്പെടുത്തുന്നവരെ തടയാന്
Step 1*
Configure Root
In Terminal give Command sudo passwd root
Give Passwords
Step 2
Click on the following Link
Click here to Download
Save the file
Mostly Downloaded to home->Downloads
Step 3
Go to that downloaded Location
Right Click on the file
(webcontentcontrol_1.2.2-0ubuntu1_i386.deb)
Select
Open With GDebi Package Installer
It will be installed
You can remove Protection by Clicking on Application->System Tools->Web Content Control
Protection On/Off
Protection is for User. So care on the Root Password.
**********************************************************************
Adding Shutdown Logout Menu to System Menu- Just Right Click on the Shut Down icon(in Right System Notification Area) Select Remove from Panel
- No other Step it'll Automatically come in System Menu....
1. Get lightning fast and clever at the command line
You can use keyboard shortcuts and other command line tricks to make entering commands easier and faster. You might already know about the ‘tab’ key which completes partial commands and even file and directory names.
Here are some other keyboard shortcuts you can use within terminal:
| Ctrl-a | Move to the start of the line. |
| Ctrl-e | Move to the end of the line. |
| Alt-] x | Moves the cursor forward to the next occurrence of x. |
| Alt-Ctrl-] x | Moves the cursor backwards to the previous occurrence of x. |
| Ctrl-u | Delete from the cursor to the beginning of the line. |
| Ctrl-k | Delete from the cursor to the end of the line. |
| Ctrl-w | Delete from the cursor to the start of the word. |
| Ctrl-y | Pastes text from the clipboard. |
| Ctrl-l | Clear the screen leaving the current line at the top of the screen. |
| Ctrl-x Ctrl-u | Undo the last changes. Ctrl-_ |
| Alt-r | Undo all changes to the line. |
| Alt-Ctrl-e | Expand command line. |
| Ctrl-r | Incremental reverse search of history. |
| Alt-p | Non-incremental reverse search of history. |
| !! | Execute last command in history |
| !abc | Execute last command in history beginning with abc |
| !n | Execute nth command in history |
| ^abc^xyz | Replace first occurrence of abc with xyz in last command and execute it |
2. Launch Ubuntu Linux Applications with keyboard
There are two ways you can achieve this:
- Use applications like Launchy or Gnome-Do that make it easier to launch applications by typing a few characters of the application’s name.
- Or you can summon gconf editor (Alt+F2 then type gconf-editor and hit enter), and navigate to apps > metacity > global_keybindings, double click on any of the run_command_N and type in the keyboard shortcut you want to assign to an application then make a mental note of the number N. Then go to apps > metacity > keybinding_commands and double click on command_N (N being the number you used above) and type in the command you want to run. As an example if you wanted to run Firefox you would type in firefox.


3. Start from wherever you left off

You can make Ubuntu remember the applications you had open when you last logged out, so that when you log back in again you’ll find all those applications running and you can resume right from where you left off.
To achieve this go to System > Preferences > Startup Applications, then go to the options tab and check "Automatically remember running applications when logging out"
4. Create a Separate Ubuntu Linux Home Partition

New versions of Ubuntu arrive every 6 months. Although you can upgrade to the latest version via the update manager, sometimes the upgrade doesn’t work as expected so some users like to do a fresh clean install.
The disadvantage with that of course is that you lose data you had in your home directory. To overcome this you can create a separate Home partition when you are installing Ubuntu, size it according to your requirements and then when you decide to install Ubuntu the next time, simply specify this partition as the Home partition (by choosing /home as the mount point).
All your files and data on the Home partition will be preserved even after a fresh install.
5. Update and Install Ubuntu Linux Software Without Internet Connection

There are lots of way to do this, the easiest of all is to use APTonCD. APTonCD allows you to create CDs and DVD’s containing all the packages you want, which you can then use to install software on computers without an internet connection.
Note that APTonCD requires you to have an internet connection (or downloaded packages) to create the installed media. However once the media is ready you don’t need an internet connection for any of the machines you want to install the software on. Insert the appropriate CD/DVD and use apt-get as you would normally.
6. Install new fonts, Microsoft fonts and improve font rendering
 Ubuntu doesn’t offer many choices when it comes to the fonts. However you can easily install new fonts including those from Microsoft like Arial, Verdana, impact and many more. You can use different sites to find the kind of font you are looking for.
7. Use PPAs, Install latest versions of software
There are a lot of steps that a software has to go through before it becomes part of Ubuntu or becomes available through the Ubuntu repositories. While all those steps lend additional stability, it generally means that you don’t get the latest versions of all the software as soon as they are released.
If you like to stay on the cutting edge, you can search for Personal Package Archives for your favorite software on Launchpad and add those to your installation’s software sources. I briefly touched on PPAs and how to use them here. If that seems like too much work, you can also download the latest deb packages and install them by double clicking (you won’t get automatic updates for the software if you install it this way).
Remember you might get into an occasional trouble or two with the latest versions, but mostly it wouldn’t be catastrophic. You can always hop over to the Ubuntu Forums to get quick help.
8. Be the root
The root account is disabled by default on Ubuntu installations, mainly to prevent you from doing something you didn’t intend to do. However if you "promise to be careful" you can enable root account as follows:

- Type sudo passwd root and provide a root password.
- Then head on over to System > Administration > Login Window, go to the Security tab and check "Enable local system administrator login"
You should now be able to login as root from the Login prompt. As an alternative you can use "sudo su" to provide your password and get root prompt.
9. Run Windows applications and games

Who wouldn’t like to play Counter Strike on Ubuntu (unless of course you are completely not into it) or perhaps even run Photoshop? Well it is very much possible and use sudo apt-get install wine in terminal if it's not installed
10. Shorten boot time with profiling
Ubuntu Linux devs have done a great job with the boot time, Jaunty is fast and Karmic is slotted to be even faster. There is however a bit more you can do by profiling your boot. Profiling lets Ubuntu make a list of all the files that are accessed during bootup, it then sorts the files according to how they are stored on your hard disk. So the next time the system is booted, the files would be read faster.
To profile boot you need to follow these steps
- At the grub menu highlight the kernel you boot most often.
- Press e for edit.
- Choose the line starting with kernel and press e again. Now add the word profile to the end of this line. Hit Enter and then press b to boot
Note that while profiling, the system will boot slower this one time, the next time however you should see an improvement. Also keep in mind that all this is machine-dependent and also depends on the arrangement of files on your hard disk, so the difference you see might not be huge, or even nil in some cases.
11. Try out different Ubuntu Linux Desktop Environments and Desktop Managers
If you are looking for something different than the default Gnome interface, you should check out alternative desktop managers that you can use. If it is a complete Desktop Environment you are looking for, KDE4 has come a long way and is now impressively usable and fun. You can do a "sudo apt-get install kubuntu-desktop" to get KDE.
12. Create a media center or a media server

It would be great if you could easily browse and manage your huge collection of music, videos and pictures. Mesmerized by Windows Media Center’s slick interface? Wait till you see what all cool options you have to turn your Ubuntu system into a media center. You can even access your media collection on your phone, PSP or a different computer if you set up a media server on your Ubuntu machine.
13. Share Firefox profile data with Windows
Many people use Windows and Linux on the same machine. If you are one of them, there would have been times you couldn’t find that bookmark you created or password you stored when you were using Firefox from within Windows. Check out how you can share Firefox profile data across operating systems without syncing it over the web (works best if you have the same version of Firefox in both OS’s). For different computers you can of course use Weave.
14. Customize Nautilus to your liking

Nautilus is the default file manager on Ubuntu. While you may be content with what it does, there is lots more you can make it do. You can use extensions to improve functionality and even add custom functionality to Nautilus
=================================
Ubuntu includes a top panel and a bottom panel by default. If you prefer to keep only one panel at the bottom just like the Windows Taskbar, then these are the steps to follow:
- Delete the bottom panel: right-click over it and click "Delete This Panel".
- Move the top panel to bottom: right-click over it, select "Properties" and change Orientation from "Top" to "Bottom".
- Add running program buttons: right-click the panel, select "Add to Panel", scroll down and select "Window List", click "Add".
- Replace the Menu Bar ("Applications-Places-System") with the "Main Menu" to save space in the panel:
- Right-click the "Menu Bar" and select "Remove From Panel".
- Right-click the panel, select "Add to Panel" and choose "Main Menu", click "Add".
- Right-click the items (Firefox, etc) and untick "Lock to Panel".
- Right-click the added "Main Menu", select "Move" to relocate it to the far left. (See Note 1 below)
These are basic changes. The panels are much more flexible than the Windows Taskbar in that many items in the panels can be easily added, removed or configured.
Note 1: The Main Menu shows the "Lock Screen", "Log Out" and "Shut Down" items if you remove the "Indicator Applet Session" item (which shows your username and the shutdown button to the right of the panel). These three items are hidden from the Main Menu when the Indicator Applet Session item is on the panel.
Note 2: If you need to restore the panels to the original state, enter the following commands into the Terminal and re-start the system:
- sudo gconftool-2 --shutdown
- sudo rm -rf .gconf/apps/panel
- sudo pkill gnome-panel
Frequently used programs can be easily pinned to the panel.
- Browse to the program from "Applications" or "Main Menu".
- Drag and drop the program to an empty space in the panel, or right-click the program and select "Add this launcher to panel".
- Right click the program icon, select "Move" and drop it to a new place in the panel.
- Right click the program icon and select "Lock to Panel".
When you set the panel to be transparent in the default Ambiance theme in Ubuntu 10.10 or 10.04, you will find that some panel items' backgrounds are not transparent, but you can make them transparent and consistent with others, following these steps:
- Go to Applications (or Main Menu) > Accessories > Terminal.
- Enter cp -R /usr/share/themes/Ambiance ~/.themes/
- Enter gedit ~/.themes/Ambiance/gtk-2.0/apps/gnome-panel.rc (for Ubuntu 10.10) OR gedit ~/.themes/Ambiance/gtk-2.0/gtkrc (for Ubuntu 10.04), to open the file with gedit.
- Search for this line bg_pixmap[NORMAL] = "img/panel.png" (for Ubuntu 10.10) OR bg_pixmap[NORMAL] = "panel_bg.png" (for Ubuntu 10.04)
- Comment out the line by placing a # at the beginning of the line, like this: # bg_pixmap[NORMAL] = ...
- Save the file.
- Go to System > Preferences > Appearance, switch to the other theme and then back to the Ambiance theme.
Note: If you'd like to change to the Radiance theme, replace Ambiance with Radiance in the above command lines, but you'd like to change to the New Wave theme, then enter cp -R /usr/share/themes/"New Wave" ~/.themes/ in step 2, enter gedit ~/.themes/"New Wave"/gtk-2.0/gtkrc in step 3, search for and comment out this line bg_pixmap[NORMAL] = "Images/Panel/PanelBarLong.png" in steps 4 and 5 respectively.
In Windows 7, frequently used programs can be pinned to the taskbar (hence called Superbar). Likewise, DockBarX, a Gnome panel plugin, can be added to Ubuntu to achieve almost the same effect to pin and unpin or launch the applications from the panel.
- Go to Ubuntu Software Center > Edit > Software Source.
- Select "Other Software" and click "Add"
- At APT line, enter ppa:dockbar-main/ppa, click "Add Source" and "Close"
- At the left panel of Ubuntu Software Center, select "PPA for Dockbar Main Group", which is added after the above steps
- At the right panel, select DockbarX and click "Install"
- Right click the panel and click “Add to Panel”.
- Select the DockBarX Applet and click "Add".
Note: A thumbnail preview of a running program is also available to DockBarX. To enable this feature, right-click the DockBarX item on the panel, select Properties, choose Window List and tick "Show Previews". Other preferences such as appearance, window item and group button can also be configured by users.
The font type and color of the panel clock follow the windows text in a theme by default. In particular, if the font color is black and shown on a dark background through a transparent panel, you can't read the clock clearly, but you can tweak it by changing the font color. And you can define the font type for your panel clock as well.
The code in Step 1 below sets the font color to white and applies DS-Digital font (Note 1), bold and size 16.
- Open up the text editor Gedit and paste the following code:
style "my-panel-clock"
{
fg[NORMAL] = "#FFFFFF"
font_name = "DS-Digital Bold 16"
}
widget "*.clock-applet-button.*" style "my-panel-clock" - Save the file as .gtkrc-2.0 (including the dot in front of the filename) inside your home directory /home/your_user_name.
- Log out and log back in (OR enter killall gnome-panel into the Terminal) to see the change.
Note 1: The DS-Digital font can be downloaded here. After downloading, unzip the file and install the font into the system for use. See Install Extra Fonts.
Note 2: The filename leading by a dot represents it's a hidden file and visible by toggling the key Ctrl-H in the Nautilus file browser.
If your Ubuntu system sets the Minimize, Maximize and Close buttons to the left in a window and you prefer to change them to the right, then follow these simple steps:
- Press Alt+F2 to bring up "Run Application" window.
- Type gconf-editor into the box, click "Run" to bring up Configuration Editor.
- Browse to apps > metacity > general, look for "button_layout" on the right panel.
- Change the value in the "button_layout" from close,minimize,maximize: to menu:minimize,maximize,close and press the Enter key.
When running an application without maximized, Ubuntu always puts it in the left-top corner of the desktop by default, but you are allowed to set a program window to open up in the center of the desktop area.
- Go to System > Preferences > CompizConfig Settings Manager
- Select "Windows Management" from the left panel.
- Click "Place Windows".
- Change Placement Mode from "Smart" to "Centered", click "Back" and "Close".
Ideally, the window manager in Ubuntu should restore the last known position of an application window, but it does not do that unless an application remembers its own window position.
When you double-click the title bar of a window, the default setting is to maximize a window. Since there's already a maximize button you can use for this, I always like to change the default setting to rolling up (or 'shading') a window when I double-click on its title bar.
- Go to System > Preferences > Windows
- In "Titlebar Action", select "Shade" from the drop-down list.
Now you can roll up a window when you double-click its title bar, and roll it down by double-clicking the title bar again. Simple as that.
Themes in Ubuntu can be customized to match the applications or suit your needs. I once tried the "New Wave" theme and the menu (File, Edit, View, etc) was hardly visible on the dark background in OpenOffice. These are easy steps to customize a theme, for example, "New Wave" so that the menu can be more visible in OpenOffice.
- Go To System > Preferences > Appearance.
- Under the "Theme" tab, click the "Customize" button while the "New Wave" theme is selected.
- Under the "Controls" tab, click any other control item such as "Ambiance" and click the "Close" button.
- Now it becomes your Custom theme and you can save it as a new theme, such as "New Wave with Ambiance Controls".
The menu should now be clearly visible in OpenOffice in this new theme (See the lower section in the screenshot).
In Ubuntu you can set nearly the same aero glass effect to window borders with alpha transparency as available in Windows 7.
- Press Alt+F2 to bring up "Run Application" window.
- Type gconf-editor into the box, click "Run" to bring up Configuration Editor.
- Browse to apps > gwd, look for "metacity_theme_active_opacity" on the right panel.
- Change the value in "metacity_theme_active_opacity" from 1 to 0.75 (or smaller such as 0.5 for more transparency).
- Then go to System > Preferences > CompizConfig Settings Manager
- Select "Effects" from the left panel.
- Tick "Blur Windows" and click the "Close" button. (Note: default values in Blur Windows can be applied.)
Note: If the aero glass effect doesn't work, check if you have updated your display driver. Go to System > Administration > Additional Drivers, activate the recommended graphics driver and restart the system.
In Windows 7, you can click and drag a window to the left or right edge of the desktop and it will fill half of the screen, or snap a window to the top edge of the desktop and it will be maximized.
In Ubuntu, you can click and drag a window to the left, right or top edge of the desktop to achieve the same result.
- In addition to CompizConfig Settings Manager, install WmCtrl if not added.
- Go to Applications (or Main Menu) > Accessories > Terminal.
- Enter sudo apt-get install wmctrl
- Enter password when prompted.
- Go To System > Preferences > CompizConfig Settings Manager.
- Select "General" from the left panel and click "Commands".
- In Command line 0, 1 and 2, paste the following codes:
- Command line 0, paste WIDTH=`xdpyinfo | grep 'dimensions:' | cut -f 2 -d ':' | cut -f 1 -d 'x'` && HALF=$(($WIDTH/2)) && wmctrl -r :ACTIVE: -b add,maximized_vert && wmctrl -r :ACTIVE: -e 0,0,0,$HALF,-1
- Command line 1, paste WIDTH=`xdpyinfo | grep 'dimensions:' | cut -f 2 -d ':' | cut -f 1 -d 'x'` && HALF=$(($WIDTH/2)) && wmctrl -r :ACTIVE: -b add,maximized_vert && wmctrl -r :ACTIVE: -e 0,$HALF,0,$HALF,-1
- Command line 2, paste wmctrl -r :ACTIVE: -b add,maximized_vert,maximized_horz
- In the same window, click "Edge Bindings" tab.
- Change Run Command 0, 1 and 2 from "None" to "Left", "Right" and "Top" respectively.
- Click "Back" button and select "General Options", change "Edge Trigger Delay" to about 500.
Ubuntu adds an icon to the desktop for every removable drive that you attach to your system. The icons can be hidden by these steps:
- Press Alt+F2 to bring up "Run Application" window.
- Type gconf-editor into the box, click "Run" to bring up Configuration Editor.
- Browse to apps > nautilus > desktop.
- Untick "volumes_visible" and close the window.
The drive icons would then disappear from the desktop. Remember that you can always access the drives from "Places".
Ubuntu enables "Desktop Wall" by default. By holding Ctrl-Alt keys and pressing the left-arrow or right-arrow key each time, it slides through desktop workspaces horizontally for you to choose one to work on. Alternatively, you can change this to a "rotate cube" effect.
 Go To System > Preferences > CompizConfig Settings Manager
- Select "Desktop" from the left panel.
- Tick "Rotate Cube".
- Select "Enable Desktop Cube" as this plugin is required by "Rotate Cube".
- Select "Disable Desktop Wall".

Immediately you can rotate your desktop workspaces in this way— holding down Ctrl-Alt keys, EITHER press the left-arrow or right-arrow key OR left-click the mouse and drag it to left or right.
You can right click your desktop, select "Change Desktop Background" and choose any one of the wallpapers pre-installed, but you need to do it each time you want to change a wallpaper. What about changing a wallpaper automatically within a certain time interval? Try Wally.
- Go to Applications (or Main Menu) > Ubuntu Software Center, enter wally into the Search box and click "Install". (Note)
- Press Alt-F2, enter wally and click the "Run" button.
- Right-click the Wally icon on the panel, select Settings.
- Click "Folders" in the left column, then add /usr/share/backgrounds to the Folder box and tick "Include subfolders".
- Click "Settings" in the left column, then tick "Play automatically on application starts".
- Set the application to auto start, using this tip Auto Start Up an Application (as Wally's option to "Start automatically when system starts" being disabled).
Your wallpaper on the desktop will automatically change following these basic settings when you log back in the system (or right click the Wally icon on the panel and select "Play").
Note: If you like to get the latest version of Wally which has an option to disable splash screen and auto quit, go to developer's site to download. After which, right click the .deb file and select "Open with Ubuntu Software Center" to install, then follow Step 2 above.
Windows Explorer allows for users to set a default view to all folders. In almost the same way, Ubuntu's Nautilus File Browser allows for these settings:
- Go to "Places" and open a folder.
- At the top of the File Browser, click "Edit" and "Preference".
- Under Default View, change "Icon View" to "List View", to see more details in columns.
- Tick "Show hidden and backup files" if that's your choice.
Other various settings, such as single or double click to open items, icon captions, list columns, preview files and media handling can be done in the same window as well.
In the Ubuntu file system, you can use Nautilus file manager to browse most files but can only write files in your home folder /home/your_name and its sub-folders such as Desktop and Documents. If you have to rename a folder or write files outside of your home folder using the file manager, you won't be able to but you can create an advanced file manager for this purpose.
- Go to System > Preferences > Main Menu
- Select "Accessories" in the left panel and click "New Item" in the right panel.
- Enter a name such as Advanced Nautilus in the "Name" box.
- Enter gksu nautilus in the "Command" box.
- Click the "OK" button and the "Close" button.
Now you can go to Applications (or Main Menu) > Accessories and see that the Advanced Nautilus is ready for use. But be careful since you can use it to delete or change any files on your system.
**********************************************************************************