

ആവശ്യം തിരച്ചിലിന്റെ മാതാവ്
വിദ്യാര്ത്ഥിസമരത്തെ തുടര്ന്ന് കംപ്യൂട്ടര് ലാബിലേക്ക് . കഴിഞ്ഞ ദിവസം നടന്ന അനുമോദനമീറ്റിങ്ങ് ബ്ലോഗിലേക്ക് കയറ്റാം എന്ന ചിന്തയുമായ് ആയിരുന്നു യാത്ര. ഡിജിറ്റല് ക്യാമറയില്നിന്നെടുത്ത ഫോട്ടോകള് ഡാറ്റാകേബിള് വഴി കംപ്യൂട്ടറിലേക്ക് കോപ്പി ചെയ്തു. Picasaweb ലേക്ക് ഓരോന്നായി കയറ്റണം. Size നോക്കിയപ്പോള് ഞെട്ടിപ്പോയി ഓരോ ഫയലും 3 mb യില് കൂടുതല്. Upload ചെയ്യാന് കൊടുത്തിട്ട് ഇഴഞ്ഞു കയറുന്നു. എന്തു ചെയ്യും. 30തില് കൂടുതല് ഫയലുമുണ്ട് . ഓരോന്നും Gimp ല് കൊണ്ടുപോയി ചെറുതാക്കലോ ഓരോന്നും Right Click ചെയ്ത് Resize- Image Option എടുത്ത് ചെറുതാക്കലോ പ്രായോഗികവുമല്ല. വല്ലാത്ത ഒരു ധര്മ്മ സങ്കടം. എല്ലാഫയലും ഒന്നിച്ചു ചെറുതാക്കാന് കഴിയുന്ന, Size കുറയ്കാന് കഴിയുന്ന, brightness കൂട്ടാനോ കുറയ്ക്കാനോ കഴിയുന്ന, എല്ലാഫോട്ടോയിലും mattom St.John's എന്ന നാമം കൊടുക്കാന് കഴിയുന്ന ഒരു സങ്കേതം . നിങ്ങളും ഇത്തരം ഒരുസങ്കേതത്തിനായി ആഗ്രഹിച്ചിരിക്കും അല്ലേ..ഇതാ അത്തരം ഒന്ന് .Phatch
ഇതാണ് ആ സഹായിയുടെ പേര് -ഇന്സ്റ്റാള് ചെയ്യാനായി Net Connect ചെയ്യുക Application- Ubuntu Software Center. click ചെയ്യുക.

Search Boxല് Phatch എന്ന് ടൈപ്പ് ചെയ്യുക.

Phatch photo bATCH Processor Click ചെയ്യുക, Install Button Press ചെയ്യുക.Software Installation കഴിഞ്ഞു.
Phatch open ചെയ്യാനായി Application-Graphics-Phatch photo bATCH Processor Click ചെയ്യുക.


Click + to add actions - + iconല് click ചെയ്യുന്നതിലൂടെ Ations Add ചെയ്യാം .
Actions Filter ചെയ്യാന് + Icon ല് Click ചെയ്ത ശേഷം വരുന്ന വിന്ഡോയിലെ

All Button Click ചെയ്ത് Filter Option Select ചെയ്യാം . Size ആണ് കുറക്കണ്ടതെങ്കില് All Button Click ചെയ്ത് Size Option Select ചെയ്യുക. Scale Button Click ചെയ്യുക.
Add Button Click ചെയ്യുക.

വിന്ഡോയിലെ canvas Width നു സമീപമുള്ള Default size 800px click ചെയ്ത് അത ഇഷ്ടാനുസരണം മാറ്റാം . അതുപോലെ Height,Resolution എന്നിവയെല്ലാം തിരഞ്ഞെടുക്കാം .

ഇതുപോലെ മറ്റ് Action കളും നല്കാം ഉദാഹരണമായി photoകളിലെല്ലാം ഒരുപേര് നല്കണമെങ്കില് + Icon Click ചെയ്ത് All-Text എന്ന option Select ചെയ്യുക.


Text optioന് സമീപമുള്ള Phatch എന്ന Text Click ചെയ്ത് ഇഷ്ടമുള്ള Text നല്കാം . Font ക്ലിക്ക് ചെയ്ത് font Select ചെയുക.
Text ന്റെ Size,Color,Orientation,position എന്നിവ നല്കുക.
ആവശ്യുഅമുള്ള Actions എല്ലാം നല്കിയശേഷം
tools menuവില് നിന്നും Execute

Save Action കൊടുക്കാത്തതിനാല് ഒരു Warning message വരും . അവിടെ OK Button Press ചെയ്യുക.

Default ആയി Desktop ല് Phatch എന്ന Folder ല് Photos Save ആകും.
As എന്നിടത്ത് ക്ലിക്ക് ചെയ്ത് File Type Select ചെയ്യാം .പിന്നെ resolution.വേണമെങ്കില് മാത്രം. Save Actionല് ഒന്നും നല്കിയില്ലെങ്കില് Default Settings എടുത്തുകൊള്ളും .
വീണ്ടും Tools Menuവില് നിന്നും Execute.അപ്പോള് ലഭിക്കുന്ന വിന്ഡോയിലെ Browse Button ക്ലിക്ക് ചെയ്ത് Folder Select ചെയ്യുക.

Batch Button ക്ലിക്ക് ചെയ്യുക. പിന്നെ വരുന്ന files കാണിച്ചുകൊണ്ടുള്ള വിന്ഡോയിലെ continue Button ക്ലിക്ക് ചെയ്യുക.

Selected Files നും Actions നും അനുസരിച്ച് സമയമെടുക്കും.
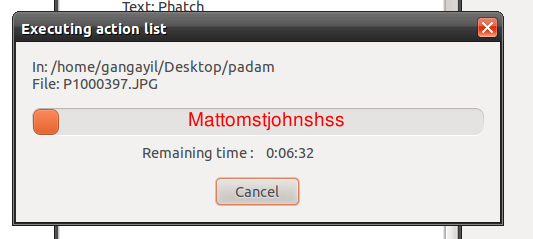
ആ progress bar പൂര്ത്തിയായികഴിഞ്ഞാല് Desktop ല് phatch എന്ന Folder ല് Source ഫയലിന്റെ അതേപേരില് ഫയലുകള് Save ചെയ്യപ്പെടും.
ഞാന് Scale മാത്രം നല്കി Phatch ചെയ്തു ഫയല് size 3.5 MB യില് നിന്നും 30 KB യായി..
ജയ് ജയ് Phatch ജയ് ജയ് Ubuntu
പന്ത് ഇപ്പോള് നിങ്ങളുടെ കോര്ട്ടിലാണ് ബാക്കി ഓപ്ഷനുകള് സ്വയം ചെയ്ത് നോക്കുക... പുതിയ കണ്ടുപിടിത്തങ്ങള് Share ചെയ്യാനും മറക്കരുതെ....
മറ്റ് Actions
- Auto Contrast - Maximize image contrast
- Background - Put colour under transparent image
- Blender-3D Objects
- Border - Variable border to the inside or outside
- Brightness - Adjust brightness from black to white
- Canvas - Crop the image or enlarge canvas without resizing the image
- Color To Alpha - Make a background with fixed color transparent
- Colorize - Colorize grayscale image
- Common - Copies the most common pixel value
- Contour - Draw a contour around image edges
- Contrast - Adjust from grey to black & white
- Convert Mode - Convert the color mode of an image (grayscale, RGB, RGBA or CMYK)
- Copy - Copy image file
- Crop - Crop the image
- Delete Tags - Delete Exif or Iptc Tags
- Desaturate - Fade all colors to grey
- Effect - Blur, Sharpen, Emboss, Smooth, …
- Equalize - Equalize the image histogram
- Fit - Downsize and crop image with fixed ratio
- Geek - Execute external command
- Geotag - Geotag an image file
- Grid-
- Highlight - Add a highlight effect
- Imagemagick - Blur, Polaroid, Shadow, Unsharp…
- Invert - Invert the colors of the image (negative)
- Lossless JPEG - Rotate, flip, grayscale and crop
- Maximum - Copies the maximum pixel value
- Mask - Apply a transparency mask
- Median - Copies the median pixel value
- Minimum - Copies the minimum pixel value
- Mirror - Symmetrical tile texture
- Offset - Offset by distance and wrap around
- Perspective - Shear 2d or 3d
- Posterize - Reduce the number of bits of colour channel
- Rank - Copies the rank'th pixel value
- Reflect - Drops a reflection
- Rename - Rename image file
- Rename Tag - Rename an Exif or Iptc Tag
- Rotate - Rotate with random angle
- Round - Round or crossed corners with variable radius and corners
- Saturation - Adjust saturation from grayscale to high
- Save - Save an image with variable compression in different types
- Save Tags - Save only metadata (lossless)
- Scale - Scale an image with different resample filters.
- Shadow - Drop a blurred shadow under a photo with variable position, blur and color
- Sketch - Transform to a grayscale pencil drawing.
- Solarize - Invert all pixel values above threshold
- Tamogen - Tone altering mosaic generator
- Text - Write text at a given position
- Time Shift - Shift Exif time
- Transpose - Flip or rotate an image by 90 degrees
- Warmup-Colorize Midtones of an Image
- Watermark - Apply a watermark image with variable placement (offset, scaling, tiling) and opacity
- Write Tag - Write a new value to a metadata tag (exif & iptc)